Loose Braid Consideration: Methods of Tightening Braid on Hose
Note: To print, please click here.
Often braid must be compressed and secured on the hose prior to welding, as the braid must always be reasonably tight on the finished assembly. Loose braid can lead to two primary problems:
- Under pressure, the hose expands axially (gets longer) even with low pressure. If the braid is not tight, the hose will grow in length until it takes up all of the slack in the braid. The assembly overall length will increase and this can cause over bending and kinking of the assembly in service.
- If the braid collars are crimped, or a rolled type braid collar clamped in place, while the braid is loose, it is possible that the braid is slightly angled or is cocked on the hose. This results in the braid wires along some carriers will be shorter than those of other carriers. The shorter wires will be overly tensioned when the assembly is put under pressure. The longer wires have slight slack in them and will not assume any of the pressure-induced tensile load until the shorter wires stretch and all of the wires are of equal length. The assembly is likely to squirm or deform before the braid wires equalize in length.
In this Bulletin, we’ll look at several common methods of tightening braid on hose. This must be done before assembly fabrication. All of the methods are illustrated in Illus. 1 at the bottom of the page.
a) Procedure for tightening braid on hose with filament tape
- Slide the hose inside the braid, positioning the hose approximately centered in the braid length.
- Grasp the braid and one of the fittings tightly, compressing the braid onto the fitting.
- Holding the braid firmly, wind two layers of tightly pulled filament tape around the braid, starting approximately 2″ behind the hose end.
- Pulling and compressing the braid tightly, continue to wind the braid with filament tape in a spiral shape.
- When the tape wind reaches approximately 2″ from the opposite hose end, give the tape a tight double wind, at right angle with the hose axis.
b) Procedure for tightening braid with screw clamps
- Slide the hose inside the braid, positioning the hose approximately centered in the braid length.
- Place a screw clamp in the approximate middle of the braid.
- Tighten the clamp firmly but not tight enough that the clamp will leave an impression in the braid.
- Pulling the braid tight against the hose, place clamps approximately every 12 – 16″ along the hose length always working from the center clamp toward the hose ends.
- Notes:
- a) For large bore hose assemblies, snap screw hose clamps are much faster to tighten. The clamp is wound around the hose, the snap catch pulled over to engage the screw onto the clamp strap, and the clamp further tightened with a screwdriver.
- b) For large quantities of assemblies, or when clamping large bore assemblies with standard screw clamps, a screwdriver bit in an electric drill is faster.
- Caution: Do not fully tighten the clamp with the electric drill, finish the last two clamp screw turns with a hand-held screwdriver. Fully tightening with an electric drill will over tighten the clamp and damage the braid.
c) Procedure for tightening braid with plastic cable ties
- Slide the hose inside the braid, positioning the hose approximately centered in the braid length.
- Place and tighten a cable tie in the approximate middle of the braid.
- Pulling the braid tight against the hose, place cable tie approximately every 12 – 16″ along the hose length always working from the center clamp toward the hose ends.
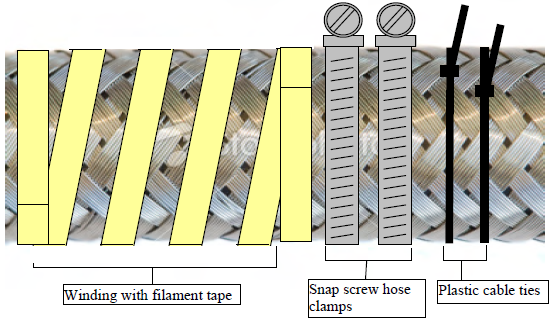
Illus. 1 – Braid tightening methods
In Engineering Bulletin #132, we take a look at the procedure for tightening large bore (8 – 12″ i.d.) assemblies using “vacuum method.”
If you have any questions or comments, please contact us.
To print, please click here.